Allen Bradley 1794-IB16D/1794IB16D I/O Flex Module
 Contact: Miya
Job Title: Sales Manager
Skype: live:miyazheng520
Email: sales@amikon.cn
Tel: 86-18020776792(Whats App )
QQ :2851195450
Brand Name AB
Product reference 1794-IB16D
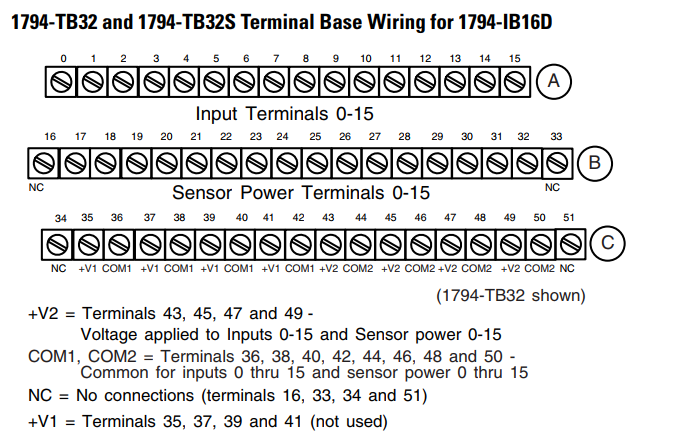
Connecting Wiring for the 1794-IB16D Module
(using a 1794-TB32 or 1794-TB32S Terminal Base)
1. Connect individual input wiring (IN00-IN15) to terminals 0 thru 15 on the 0-15
row (A) as indicated in the Wiring Connections for 1794-IB16D table.
2. Connect individual Sensor Power wiring (sensor power 0...15) to terminals
17...32 on the 16-33 row (B) as indicated in the Wiring Connections for
1794-IB16D table. Do not connect to terminals 16 or 33.
3. Connect the associated +V2 DC power lead of the input device to the
corresponding terminal on the 34-51 row (C) for each input as indicated in the
Wiring Connections for 1794-IB16D table. (The +V2 power terminals of row
(C) are internally connected together.)
4. Connect the associated input common (3-wire devices only) to the
corresponding terminal on the 34-51 row. (C) for each input as indicated in the
Wiring Connections for 1794-IB16D table. (Commons are internally connected
together.)
5. Connect +V DC power to pin 43 (+V) on the 34-51 row (C).
6. Connect -V DC common to pin 44 (COM2) on the 34-51 row (C).
7. If daisychaining input wiring power to the next terminal base, connect a jumper
from terminal 49 (+V DC) on this base unit to the power terminal on the next
base unit (refer to the installation instructions for the next terminal base unit).
8. If continuing input wiring common to the next base unit, connect a jumper from
terminal 50 (common) on this base unit to the common terminal on the next base
unit (refer to the installation instructions for the next terminal base unit).
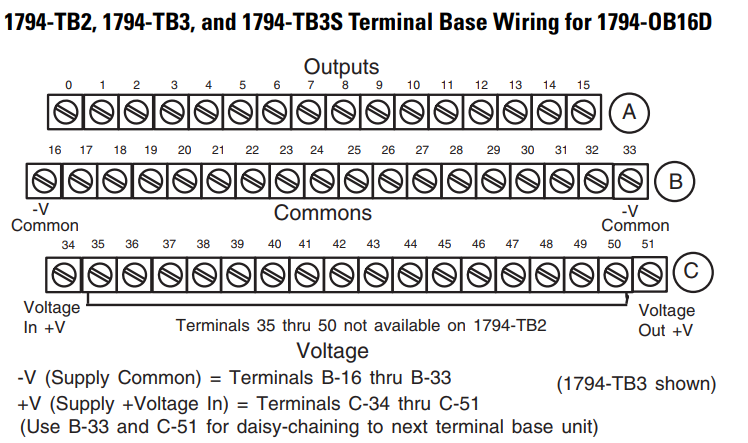
Connecting Wiring for the 1794-OB16D Module
(using a 1794-TB2, 1794-TB3, or 1794-TB3S Terminal Base)
1. Connect individual output wiring to numbered terminals on the 0-15 row (A) as
indicated in the Wiring Connections for 1794-OB16D table.
2. Connect the associated common for each output to the corresponding terminal
on the 16-33 row (B) as indicated in the Wiring Connections for 1794-OB16D
table. (The common terminals of row (B) are internally connected together.)
3. Connect +V DC power to terminal 34 on the 34-51 row (C). (The power
terminals of row (C) are internally connected together.)
4. Connect DC common (COM) to terminal 16 on the 16-33 row (B).
5. If daisychaining power to the next terminal base, connect a jumper from terminal
51 (+V DC) on this base unit to terminal 34 on the next base unit.
6. If continuing DC common to the next base unit, connect a jumper from terminal
33 (common) on this base unit to terminal 16 on the next base unit.
RELATED PRODUCT
|
GE
|
DS200SDCIG2AFB
|
|
GE
|
531X305NTBACG1
|
|
GE
|
531X113PSFARG1
|
|
GE
|
531X111PSHAPG3
|
|
GE
|
IC697CPM790
|
|
GE
|
DS200LDCCH1 DS200LDCCH1ALA
|
|
GE
|
IC695CRU320/IC695CRU320CA-EL
|
|
GE
|
IC693CPU374-KZ
|
|
GE
|
IC695CPU315
|
|
GE
|
IC693ALG392
|
|
GE
|
IC697CPX935
|
|
GE
|
IC694MDL740
|
|
GE
|
IC693MDL740F
|
|
GE
|
IC693MDL740
|
|
GE
|
IC200MDL740
|
|
GE
|
IC200ALG630
|
|
GE
|
IC200ALG322
|
|
GE
|
DS200PCCAG9ACB
|
|
GE
|
531X303MCPBCG1
|
|
GE
|
IC670MDL740
|
|
GE
|
IC694MDL753
|
|
GE
|
IC694BEM331
|
|
GE
|
IC694APU300
|
|
GE
|
IC693PCM301
|
|
|
|
BENTLY NEVADA
|
3500/15 AC 127610-01
|
|
BENTLY NEVADA
|
3500/72M 176449-08
|
|
BENTLY NEVADA
|
3500/32M 149986-02
|
|
BENTLY NEVADA
|
3500/53 133388-01
|
|
BENTLY NEVADA
|
125388-01
|
|
BENTLY NEVADA
|
128275-01
|
|
BENTLY NEVADA
|
330180-X1-CN
|
|
BENTLY NEVADA
|
3300/46-46-04-02-01
|
|
BENTLY NEVADA
|
3300/20-13-03-01-00-00
|
|
BENTLY NEVADA
|
330780-91-00
|
|
BENTLY NEVADA
|
330103-00-04-10-02-05
|
|
BENTLY NEVADA
|
330130-040-01-00
|
|
BENTLY NEVADA
|
330130-080-02-05
|
|
BENTLY NEVADA
|
172109-01
|
|
BENTLY NEVADA
|
330103-00-05-10-02-00
|
|
BENTLY NEVADA
|
330703-000-060-10-02-00
|
|
BENTLY NEVADA
|
330103-00-10-10-02-00
|
|
BENTLY NEVADA
|
330103-00-06-10-02-00
|
|
BENTLY NEVADA
|
330730-080-00-00
|
|
BENTLY NEVADA
|
172103-01
|
|
BENTLY NEVADA
|
3500/22M
|
|
BENTLY NEVADA
|
330105-02-12-90-02-05
|
|
BENTLY NEVADA
|
3500/64M
|
|
BENTLY NEVADA
|
3500/44M
|
|
BENTLY NEVADA
|
5300-08-050-03-00
|
|
BENTLY NEVADA
|
330878-90-00
|
|
BENTLY NEVADA
|
330103-10-14-10-02-CN
|
Our Advantages:
1.365 days warranty for all the goods from us.
2.2000+ suppliers with us, we could help you to get any components which is difficult to get.
3.Risk-free guarantee, 60 days refund. If the item you purchase from our store are not of perfected quality, simply return them to us for replacement or refund.

|
If you have any question pls do not hesitate to contact us.We can supply all kind of the
automation parts,if you want to purchase
parts pls send the parts model to my mail, I will prompt reply you as I receive the mail.Hope anyone inquire from us.
Waiting for your inquiry.
|